Monday, February 3, 2014

Pink Lemonade Sherbet

Ingredients
  • 1 can frozen pink lemonade concentrate
  • 2-1/2 cans water
  • 1 carton Raspberry sherbet
  • 2 liter Sprite
  • 3 lemons
Instructions
  1. In a pitcher, combine the pink lemonade concentrate and the cans of water.
  2. Freeze for about 4 hours until slushy.
  3. In the pitcher, add the lemons and a thick layer of raspberry sherbet.
  4. Pour the Sprite over the top of sherbet and stir just a bit so it gets nice and frothy on top.
  5. Serve immediately.


pink lemonade pink sherbert party punch

Friday, January 17, 2014

Updated DIY ballet barre

DIY ballet barre tutorial

We took a quick trip to Home Depot and bought a 2″ wood dowel.  It was about $8, and was 48″ long.  They can cut it to your specifications there if you want it shorter.  I cut mine at home with my miter saw to 36″.  The dowels come unstained/unpainted but are very smooth.  I ran some sandpaper over it just in case (who wants splinters?) and spray painted it white.
I also bought hardware that is designed to attach a stair banister to the wall.  It happened to be in the same aisle in our store.  Each piece was about $4 and came with the screws to attach it to the wall.  I bought the brushed nickel finish.
First, I screwed the hardware into each end of the dowel.  I predrilled guide holes to make it easier.
When both brackets were in place, we centered the barre on the wall at a height that works for her.  I used my stud finder to place the right bracket into a stud with the mounting screws, but on the left I needed to use drywall anchors to give the screws extra stability.  Annabelle is old enough to know not to hang on her barre, but for a younger dancer I would try to mount both brackets in studs, just in case!
The laser level made it easy to keep the barre straight as I hung it.  My helper lived up to her name, too!
There are only four screws keeping this on the wall, although they’re certainly holding it on there sturdily.  But it will easy to remove, patch, and paint when we move in the summer.
I contemplated putting a big mirror on the wall behind it–I have one because we pulled down a huge plate glass mirror in a bathroom–but that is a bigger project and it just didn’t seem worth it for 8 months of use.  Maybe in our next house!  She can open her closet door and use the full-length mirror on the door to check her form, though.
Also, the hardware that I used only projects the barre from the wall a couple of inches.  If you wanted yours to come out further (for a lot of leg work, for example), you might try closet hardware that’s used to mount hanging clothes rods.
please check out http://www.11magnolialane.com/2012/11/26/diy-ballet-barre-for-my-tiny-dancer-tutorial/ this is where i found this lovely diy ballet barre .
thank you

Thursday, January 2, 2014

Classic Ballet Hair bow


I generally have three criteria when it comes to making craft items.  It's got to be quick, it's got to be simple and the finished item has to be used.  These ballet hair bows certainly fulfil those requirements and as an added bonus, they're really pretty too!  While I've glued my bow onto a hair comb, they're equally at home on a hair slide/barrette, or even sewn onto a hair band.


Materials

One length of Ribbon
One Pair of Scissors
One glue gun
One Hair comb (or slide/barrette)


-Cut 3 lengths of ribbon.  For the bow pictured I cut 1 x 4.5cm (1.7inches), 1 x 9cm (3.5 inches) and 1 x 17cm (6.7inches).  

If you are using larger hair combs, the proportions to use are:
One piece of ribbon should be cut just slightly longer than the length of the comb
One piece of ribbon should be just under double the length of the comb and 
One piece of ribbon should be cut to a length three times the width of the ribbon you are using.

-Snip the ends of the 9cm (middle length) ribbon in an inverted arrow shape.


-Using the 17cm (longest length) ribbon, fold  the ends to the centre of the ribbon, one at a time, and use the glue gun to glue the ends in place.  I usually make mine overlap.

-Glue the folded and glued ribbon (longest length) onto the centre of the arrow cut ribbon (middle length).

-Using the 4.5cm (smallest length) ribbon, fold around the other two ribbons and glue at the back.

-Glue onto hair comb and wear to class.

Diy Ballet Barre

MATERIALS(4) 1.25″ PVC crosses
(2) 1.25″ PVC tees
(4) 1.25″ PVC elbows
(2) pieces 1.25″ PVC pipe cut to 24″ long
(6) pieces 1.25″ PVC pipe cut to 12″ long
(2) closet rods cut to 57″ long
Craft foam sheets
Sandpaper
Spray paint
INSTRUCTIONSI won’t bore you with step by step directions for putting this thing together. The photos are pretty self-explanatory. After you get the PVC pieces assembled there are a few last details.
1. Use the sandpaper to “erase” the black number and letter markings from your pieces.
2. Use the craft foam to fill the gaps where the closet rods fit into the tees and crosses.
  • Cut it the same width as the joint pieces (mine were 4.25″).
  • Roll it into a tube shape. Depending on the thickness of your foam you may have to overlap the ends so you create a double layer. I found it easiest to remove the PVC joint from the other pieces first so you’re working with one small piece instead of the whole barre.
  • Slide the rolled up tube into the PVC joint.
  • Wiggle and twist the barre into the center of the tube. This is a little tricky. I used my left hand to try and keep the foam from shooting out onto the floor but you can see it did slide out a good inch or so. You want it to be a tight fit so it’s stable but not so tight you can’t put it together.
DIY Portable Ballet Barre | laughingabi.com
Once I had everything together (and was sure it would work), I took it all apart and hit it with some hot pink spray paint. I’m always amazed how much paint changes things.
DIY Portable Ballet Barre | laughingabi.com
I want to point out that this is not as stable as a barre that attaches to the wall. My dancer is 13 years old uses it for balance and form. If your dancer is younger and will be leaning on the barre or putting a lot of weight on it, this may not be a good option for you.
Please check out the website i found this from :http://www.laughingabi.com/diy-portable-ballet-barre-phase-1/

Saturday, November 9, 2013

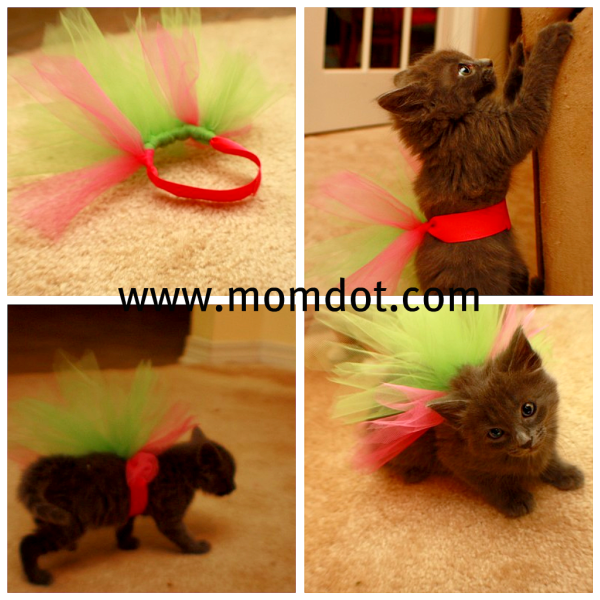
tutu for a kitten


 So first of all you need to know how to make no sew ballet tutu , if you don't check out my older post on how to make a no sew tutu.
All you need is tulle and elastic.
start by making  a no sew tutu , but  only make half of the elastic, just like the picture below .


Wednesday, September 25, 2013

Two Ballet Films

Ballet shoes by Sandra Goldbacher


First position by Bess Kargan

Thursday, September 19, 2013

Piano ! Tutorial

Pyotr Ilyich Tchaikovsky Swan Lake Easy
 

Pyotr Ilyich Tchaikovsky Dance Of The Little Swans


Pyotr Ilyich Tchaikovsky March Of The Nutcracker suite 


Pyotr Ilyich Tchaikovsky Dance Of The Sugar Plum 
Fairy 

Wednesday, July 10, 2013

Monday, June 24, 2013

How to make a pair of pointe socks

What you will need :
2 hairnet
2 elastic band
Tissue
Water
Bowl

How to make it


  1. 1
    Dip some tissues in water and mould them around your toes to form the shape of a pointe shoe toe.
  2. 2
    Squeeze excess water away.
  3. 3
    Tie the rubber band around the toe to keep the tissues in place.
  4. 4
    Wrap the hairnet around the tissues as tight as you can.
  5. 5
    Place the sock on top.

    And voila

    Tips:

    Let the tissues dry before you put the sock on otherwise they'll get wet

    Warning :

    Don't try and dance pointe in these because they won't carry your weight properly.

How to make pointe shoes


What you will need :

1 large square of cardboard
Any liquid glue
Cheap plastic bristled paintbrush
Fabric ( optional)
Cotton balls

How to make it:


  1. 1
    Measure. Take your large square of cardboard and measure your foot, tracing would be best, cut this out, but make it a little boxy, cut your fabric too. If desired, take cotton balls and paste to the bottom and inside front of your shoe. Pointe shoes always have padding for the toes and feet.
  2. 2
    Cut out the sides and a tall flat front, just like on pointe shoes.
  3. 3
    Now, cut out a second bottom foot piece, but this time, cut out a large oval so that you can stick your foot in.
  4. 4
    Tape your slipper together.
  5. 5
    Take your fabric and glue the slipper together. Take a cheap paint brush, dip it in Elmer's school glue and apply to the cardboard shoe, then stick fabric on.
  6. 6
    Repeat. Now do the same with you second slipper! (Add a pretty tail to tie around your ankle if desired!)
    And voila.

    Warning:
    Be careful.
    Not strong enough to dance in.

    Tips:
    Take your time

Wednesday, June 19, 2013

Ballerina Party Ideas

Having a ballerina party ? first start with the invitation .
What you will need :
- Ballerina top body part  template
-square of tissue paper
-thin, white ribbon
-double sided tape
  how to:


After you have folded your square of tissue paper accordion style, you use your double sided tape and adhere it to the front of your bodice attaching the tape right at the waist. You'll want to make sure the folds are spaced evenly to get a pretty skirt form.


The tape should be about 2" so that you have enough to have some on the back.


Turn the dress back to the front and fold down the top half of the tissue paper. Then kinda smoosh (my spell check is telling me that's not a word, but since it's quite possibly the best word in the English language I'm gonna have to rebel) the tissue paper lightly with your finger-you don't want to flatten it completely, just smooshed down enough that the top layer will lay nicely (yet poofy) over the top of it.


Next, f0ld down the top layer of tissue paper and gently give it a little crease to secure the fold.


Now, using the tape on the back of the bodice lay the middle of your ribbon across it.


Turn it over and tie the ribbon into a bow and you're done!


I then used a piece of double-sided tape to attach the dress to the invite.


The invite itself, is a 6x4 pice of light pink cardstock. I used brown ink to darken up the sides and a strip of white ribbon, layered with sheer pink and white polka dot ribbon, across the top. I had some brown scrapbook stickers on hand so just layed a letter K on top of the ribbon for little miss K. I finished it off with 2 hole punches on the top and a matching pink/white polka dot ribbon run through.

The back of the invitation had all the party information:

here is the link to the official site :http://loveseweetlove.blogspot.com/2012/01/ballerina-birthday-party.html


 ________________________________________________________________

Now for the snacks
Do you like popcorn ,well here is a simple, easy idea
What you need:
Popcorn
Ballerina popcorn box template

How to make it:
Print the ballerina popcorn box template .Fill with popcorn


And voila


Sunday, June 2, 2013

Teen DIY

Do you like to DIY ? If so, I know a great blog that offers amazing tutorials! Teen DIY! Don't forget to check it out at http://teendiy.blogspot.com/